By the end you will have a small purchasing process with two lanes, a decision and an attribute on one of its steps.
You need: the plugin installed, and an Administrator account. Works in: the free version. Written for: version [PLUGIN VERSION].
1. Create the model
- In the WordPress dashboard, open Manage Models.
- Choose New Model, give it the name “Purchase to Pay” and pick a folder.
- Choose the Owner. The Owner is the person accountable for the model.
The model opens in the editor as a Draft, checked out to you.
2. Add a pool and lanes
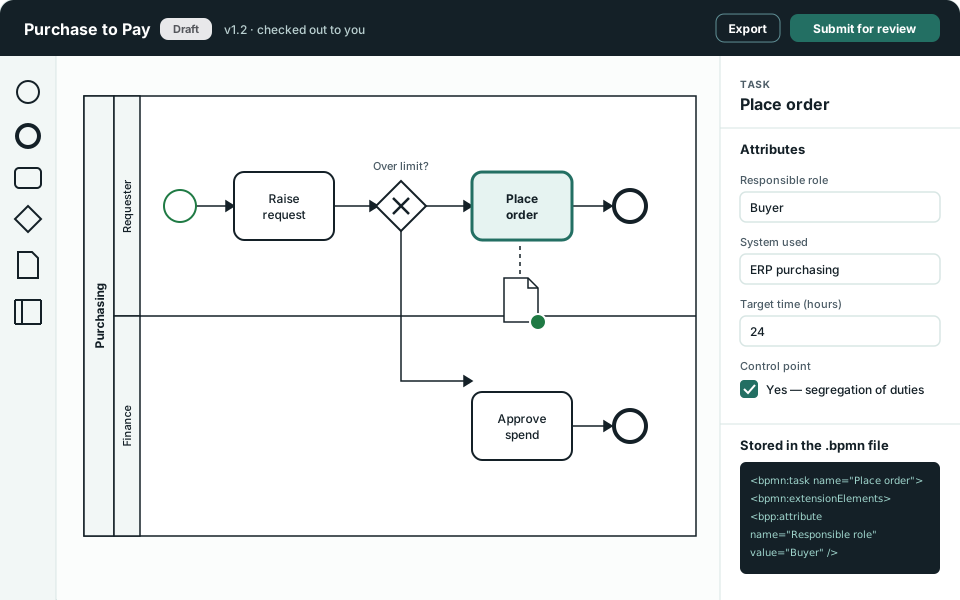
- Drag a pool from the palette on the left onto the canvas and name it “Purchasing”.
- Select the pool and add a lane. Name the two lanes “Requester” and “Finance”.
Tip: a lane answers one question: who does this step? Use roles, not people’s names, so the model survives a change of staff.
3. Add the steps
- Drag a start event into the Requester lane.
- Select it, choose the task from the menu beside it, and type “Raise request”.
- Carry on from each new shape: add “Place order”, then an end event.
4. Add a decision
- Add an exclusive gateway after “Raise request” and label it “Over limit?”.
- Draw one path to “Place order”, and a second path down to a new task “Approve spend” in the Finance lane.
- Label each path with its answer.
5. Record attributes
Select “Place order”. In the panel on the right, open Attributes and fill in the fields for this step, such as the responsible role and the system used.
Attributes are saved inside the model’s .bpmn file, so they travel with it when you export.
6. Save your work
Save the model, then check it in. Checking in releases it so the other people assigned to it can open it.